Tuesday, October 8, 2013

Bonnet pattern

I was challenged, recently, to make a bonnet. My sister-in-law handed me a bonnet that her daughter had worn as a baby, and told me I needed to try to make them too, because they're wonderful and hard to find. I thought, this sounds like a bit of a challenge, because I'm not used to making patterns, and I'm not even much of a bonnet person- but I tried anyway. What I came up with was a bit different than the original, but I think with a couple of tweaks, it could be pretty much the same. Anyway, here is how I did it, after tugging and stretching and pondering a while.


The bonnet I made, is the rainbow one: the other is the one I used for inspiration and a guide. I don't know what the sizing is on these: all I know is that they JUST BARELY fit my 3 1/2 year old, who wasn't extremely happy to have them on her head. So maybe they'll fit as little as a 1-year-old? I really haven't the foggiest.

I started with a circle. Well, half a circle. Anyway, the thing has a diameter of about 12", except for a little bit on one edge, where I wanted to make the hem at the back of the neck. I think that it's not necessary, to add the bit that juts out from the circle, but I added it anyway. The bit that juts out, is about 1/2" to 3/4" deep. I cut out ONE of this pattern piece, after folding the fabric in half where you see the arrows saying Cut on Fold.


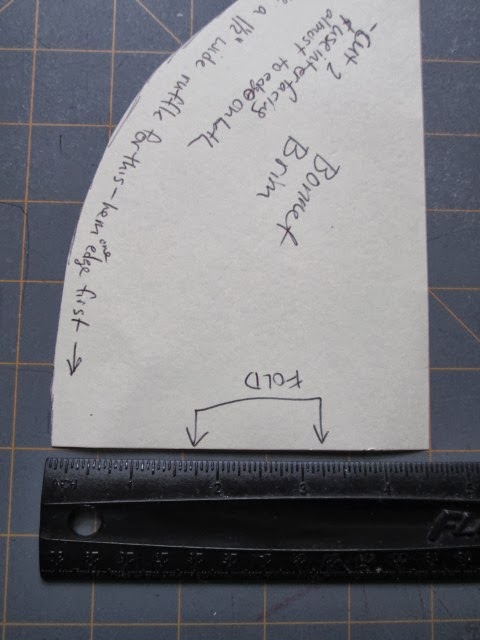
Next, I made the brim. Or maybe I started with the brim and then did the hat part. But that's not important. The brim is easy. You'll have sort of a long half oval when you cut this out. I cut two pieces of fabric (again, folded in half where it's noted), and two of interfacing. I think if you used thick interfacing you could use just one layer, but I had fairly lightweight stuff.


Next, I added interfacing to the backside of each of the fabric pieces, for the brim, and sewed them together (fronts of fabric facing each other) except for a little gap that I used for turning it right side out. I used a 1/4" seam allowance. And then, of course, I turned it right side out and topstitched the whole thing. Oh and I clipped the corners and made little notches along the curves, before I turned it right side out.

After that, I created the back hem of the bonnet. I used the part of the back that juts out from the circle, and turned it on itself twice so I had a nice clean hem with no raw edges, and sewed. I had to go slowly, because well, it's rounded, and it's hard to hem rounded things! The whole thing looked more like Just A Circle, when I was done.

Then, the part I was dreading: gathering the part of the bonnet that attaches to the brim, and attaching it. I set my sewing machine to it's longest straight-stitch setting, and sewed around the raw edge of my circle piece, leaving longish thread tails on both ends. I sewed this line about 1/4" in from the edge of the fabric. (No backstitching!!) I pinned some places on both the bill AND the circle, so I would know I was gathering correctly. This is just like making a ruffle (a total pain in the rear, I say, but quick work because it's a small item, so I got over it). I pinned the middle, and then in quarters, so that there were three evenly spaced pins on the brim and the circle. Then I pulled one string on one end, til the circle was gathered to the right length on one side, and repeated it on the other side, distributing the gathers as needed, so it looked even and not patchy and weird. I did it sort of like this, but didn't think of doing more than one row of stitching... might have to try that next time!

Lay the ruffled edge on the straight edge of the brim, and PIN, PIN, PIN. Make sure when you turn it right side out, that the whole shebang looks right. Turn it right side out to make sure, before you sew. I had to unpin and redo, and can only imagine how mad I would have been if I had SEWN it wrong and had to do that whole step again. Now sew it together. I actually sewed two lines- one about 3/8" in, and one a little closer to the edge.

Add your ties. I made mine with the fabric I was using for the rest of the bonnet, but you could use wide ribbons too, if you wanted. I cut 3" wide strips of fabric and turned each edge to the middle, then folded them in half, so I ended up with ties that were 3/4" wide or so. (I can't remember how long they were, but probably 18" long or so- you can make them however long you like). These I sewed on to the inside of the bonnet where the brim and the neck hem met. I did a couple of lines of stitching to make sure it was secure.

Last: elastic. I used 3/8" wide braided elastic. It goes all the way across the neck opening, on the inside of the bonnet of course, right above the hem. I held it where it needed to go, and stretched it hard, while I did a straight-stitch along one edge of the elastic. Then I did the same thing on the other edge of the elastic. That makes it pretty, but you could probably also do a 3-step-zigzag stitch all the way down the elastic too, instead, if you wanted.

DONE!


I don't mind if you make a million of these and sell them, by the way.

Friday, July 20, 2012

1,000 fan giveaway!

I'm posting this a little late I guess, but here you go! I was having trouble navigating blogger for a bit, but I'm on track now. Anyway, I've reached OVER 1,000 Facebook fans and am doing a big giveaway. Here's what's up for grabs:

1 nursing cover: let me know which one you like! Enter HERE

1 OS pocket diaper: again, let me know which one you like!  Enter HERE

1 Medium Wetbag from Nettie's Hands!  Enter HERE

1 Small Wetbag- choose red or green. These are not in stock, so don't get confused if you can't find them in my store. :)  Enter HERE

1 full-size diaper balm from Tree of Life!  Enter HERE

1 full-size pack of Pixie Pieces wipes bits from Tree of Life!  Enter HERE


Leave all your comments here, unless you've already left a comment on my Facebook page.
Thanks for being a fan, and thanks for stopping by!

I have decided, in honor of the giveaway, to also have a discount code for my online store! Here it is, for 10% off: 1000FAN  You can use the code til Monday, July 23rd, at midnight eastern, so if you don't win, you still...

Monday, July 9, 2012

Photo Shoot!

I am planning a photo shoot for my new website. If you have a child (or children) in diapers, would you like for him/her/them to be a diaper model on www.pixiefluff.com? Do you nurse your child? I also make nursing covers, and need models for those.

I want models of all diapered ages- Newborn (or close) to 3 years old or so, and nursing mothers of different body types, of children the same ages.

You do NOT have to currently own a Pixie Fluff product, or currently use cloth diapers. I will provide Pixie Fluff diapers to those who don't already own them. If you are borrowing a diaper, it will be put on over a disposable if that's what you use. You will then have the option to buy the diaper you have used, at a discounted price, or give it right back to me.

This is free for you to participate in. That's right, no charge for this photo session. I will also provide all models with a copy of any pictures they are in.

Date is to be determined, but I am hoping for a Saturday or a Sunday, while the weather is still warm. The photo shoot will be somewhere in Ashe County, NC.

I will update you more as I know more about the availability of the photographer.

Please comment below if you are interested in being involved with the photo shoot, so I can keep track of everyone. :)

Saturday, March 3, 2012

Healthy pancake/waffle recipe

So, this is way off topic, but I had to share this recipe I came up with!

Combine in a large bowl:
1/2 c all purpose flour
1/2 c whole wheat flour
1/2 c quick oats
1 3/4 tsp baking powder
1 tsp salt
1 Tbsp brewers yeast
2 Tbsp flax seed meal
1/2 tsp cinnamon

then melt:
3 Tbsp butter or margarine
and add to that,
3 Tbsp honey.
pour the butter and honey into:
1 1/2 c milk

Pour the wet ingredients into the dry ingredients, and mix well.
Let it sit for 5 minutes, it will thicken a little.
Then cook your pancakes or waffles as usual!
These are especially tasty with a little butter or margarine, and some fruit spread on top!

Wednesday, November 2, 2011

1000 fan giveaway!

I know I am thinking ahead, I only have 849 fans... but in case anyone is still looking at this blog, here is what I would LIKE to give away when I hit 1000. It may change before then though...

One Pixie Fluff OS pocket diaper with an insert (probably a hemp/bamboo trifold insert)
One pack of Pixie Pieces wipes bits from Tree of Life Herbals
One container of Diaper Balm from Tree of Life Herbals
A wetbag (not sure yet of size or maker)
Maybe a dryer ball or 4
Maybe some detergent
A nursing cover and nursing pads

Now... to decide if one lucky winner gets it all or if it should be divided among several!

Thursday, September 29, 2011

Detergent

What is your favorite cloth diaper detergent? Right now I really love Clean B but it can be hard to come by. I've been trying grocery store brands but none really seem to work all that well. I have made my own, too. Mix equal parts of Washing Soda, Borax, and Oxyclean to get your detergent. I use 1/4 cup in each load, since I have a top loading non-HE machine. Oh and the off brand of Oxyclean works just as well as the big brand. That's all for now but if you have a detergent you LOVE, please mention it in the comments below!

Friday, September 23, 2011

Off topic! Apple Pie!

Dixie's Apple Pie

Preheat oven to 425 F

Make filling:
-stir together:
4 cups chopped apples
1/4 cup white sugar
1/4 cup brown sugar
1/2 cup flour
-sprinkle with cinnamon

Make Dough
(I loosely followed Joy of Cooking's recipe for this, here is what I did):
-chill:
3/4 cup shortening
-stir together:
2 1/2 cups flour
1 1/2 tsp kosher salt
-cut in:
1/2 of the shortening,
-crumble it up with your fingers until it is a little coarser than cornmeal
-cut in:
the rest of the shortening
3 Tbsp Country Crock (or other butter or spread)
-slice through it with two knives until there are no pieces of shortening any bigger than large peas
-add:
6 Tbsp ice water
-knead it until it comes together.
If you have to, add a tiny bit more water (if it is too crumbly) or flour (if it is too wet).

Tear dough into two equal pieces.

Roll first ball of dough out to about a 1/8" thick circle.
Put it into a greased pie pan.
Pierce the dough in several places with a fork.

Put the filling into the pan.
Break up 1/4 cup of butter or spread and scatter it over the apples.

Roll out the other half of the dough into about a 1/8" thick circle.
Place this dough on top of the apples, and trim the excess.
Pinch the edges to seal in the filling.
Cut slits and/or use a cookie cutter to make airholes in the top of the pie.
Butter the top of the pie, then lighly sprinkle it with sugar and cinnamon.

Place pie in oven at 425 F for 15 minutes.
Then turn down the heat to 375 F and bake for another 30-45 minutes or until golden.